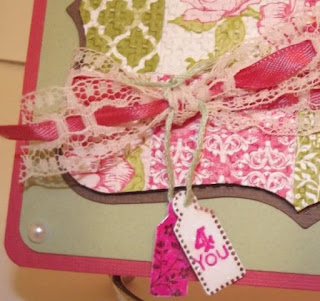
My ma's birthday is this month just like my daddy's. My ma is an AVID quilter. she eats, sleeps, lives and breaths quilting. LOL My favorite type of quilts are "rag quilts". they aren't intricate, and they are simple to make and they don't have to be as perfect as many other quilts with a very detailed design. anyhow, here's a sneak peek of what I made... clicky click the linky below to see the full card and all the deets. :)
Here is the whole card
as you can see, it's quilted. I didn't want to do some fancy quilt design... I'll do that at a later date. but this is more like a rag quilt, just simple, beautiful squares. I took a half sheet of sticky shipping label and cut it into a square a tiny bit bigger than the top note shape. I peeled off the protective sheet and then attached all the squares to the sticky side of the label. I turned it upside down (deco side facing the top note die to get a better cut on the slots that go all around it) ran it through my big kick with the Stampin' Up! top note die. I cut the shape out along the slots and then I ran it through the big kick again with the Stampin' Up Square Lattice embossing folder. Then I ran some brown bazzill through the top note as well and then attached the quilted part with Stampin' Up! dimensionals.
Here is a side view of the card and you can see the embossing well. i really love how this came out!
For the ribbon, I really wanted to use some white lace, but the white I had, had a huge ruffle on it and it covered the whole bottom of the top note shape. So, I just went with cream (there is cream on part of the deco cardstock--but my lighting is HORRIBLE it was too cloudy to take pics outside today). I took regular satin ribbon and wove it through every other hole in the lace. I tied it around the top note die.
I then stamped 2 tags from the Stampin' Up! tiny tags set. for the pink one, I stamped the pink tag and then I took the small flower stamp from the same set and stamped the flowers on top of the pink tag, in chocolate chip brown. once the tags were stamped I covered them in glossy accents so that they got hard and would hold up to being handled better since they were to small. I poked holes in them and threaded some nice green embroidery floss through them and weaved the floss through the knot in the ribbon lace.
the front of the card looked a little plain on the green cardstock on top of the base. I really don't like having a lot of "open" or "bare" space on my cards, so I decided to add white pearls to the corners. I think that really completed the beautiful feel of a "womanly" card.
For the inside of the card I layered some green on top of the brown because the green is better for reading ink when I write on the inside.
I used the happy birthday sentiment from the Stampin' Up! Happiest birthday wishes set. i stamped it on my stamp-a-ma-jig sheet and lined it up center in the middle of the bottom and then stamped it there. I lined up my flowers and did the same, stamped them in pink passion to stamp the flowers from the tiny tags set. I used a micro-sized pearl to dot the "i" in birthday and then added pearls to the corners.
I am REALLY satisfied with how this card turned out, though i am anxious to try other quilt patterns for future cards. I can't wait for my mom to get this card! Her and daddy just bought a business in the industry that my daddy has been born and raised into, fixing, sharpening etc. of saws, saw blades, and other tools as well as heavy duty construction equipment. I sent daddy's bday card to the shop earlier this month and I'll send ma's too, so she has something nice to put on her desk since she literally spends more than half of her day there. Ma is also a school bus driver, so she is up from 3:30 am until about 11pm and I know she is tired! i just wish i could have made her a real quilt to cozy up to at work when she wants to take a nap. LOL
Well, thanks for checking out my card today, I hope you liked it :)
Keep on Craftin', and please, be kind to one another!
~Melisa Marie


No comments:
Post a Comment
Hi! feel free to leave me a comment, I am always interested in what my readers think about my crafty creations! I reserve the right to delete any comment that is offensive or vulgar, and I will definitely delete ANY post that is SPAM. This does not mean I will delete your comment just because you say you do not like my work, but please just keep all language clean and help keep my blog clean and free of spam!
If you leave a comment, *PLEASE* click on "Subscribe by e-mail" so that follow up comments may be sent to you, because I *ALWAYS* reply to comments! Thanks!