
As I said the other day, I know that I'm very far behind on sharing projects, so here I am with an update and some cute Halloween cards that I made for Halloween.
Here is a sneak peek, click below to see the rest.

I made a total of 8 cards using the same layout design, and Halloween owl image; however, I did use a few different embellishments on different ones.


I got the idea for these cards from a video on youtube. I watched the video and was able to make all 8 of these cards very quickly, within an hour, once I got all of the images colored.
The cards turned out way more cute!!
The card size is 4" x 4" when closed and 4" x 11 3/4" when fully opened. There are 3 layers to the card, the top flat, the middle flap and the base where the image is.

For the first I used a button that says "Boo" attached to a paperclip to keep the card closed. Also, it's a bit hard to see, but I also inked the edges of each layer of the scalloped oval to give it a little more dimension. The "spooktacular" bat sentiment is a Studio G wood mounted stamp from the $1 bin at Michael's. I used Colorbox Catseye inks to ink the word and Memento Tuxedo Black to ink the bat, and then colored in the bat wings with a Zig marker. I then punched it out with the Stampin' Up! Decorative Label punch.
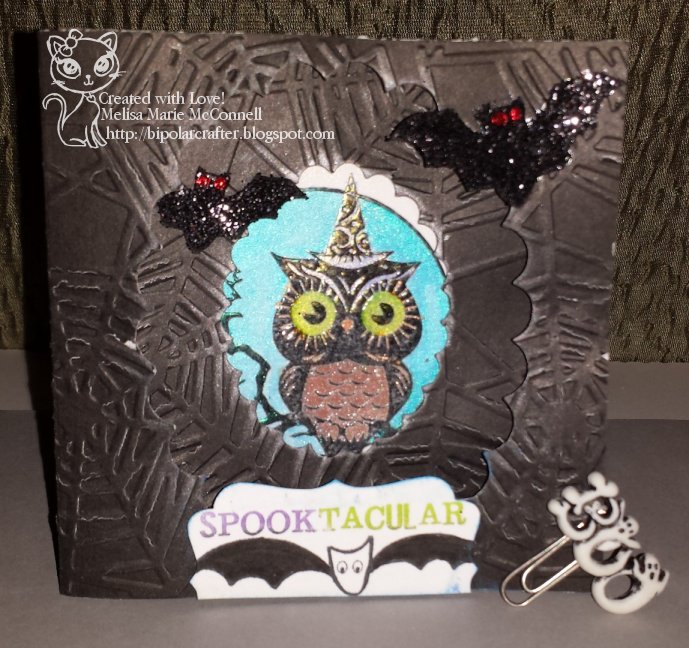
The top flap and the middle flap have scalloped ovals die cut into them in 2 different sizes, the smaller size being on the middle flap of the card so that it looks layered when I used the larger die on the top flap. I used the Spellbinders Nestabilities scalloped oval dies.

I love that there are spiderwebs on the inside flaps, too!
This ADORABLE Halloween owl image is an Inkadinkado stamp, Inkadinkado 60-30739. I stamped it in Versamark and heat embossed it with Recollections black embossing powder.

Aren't the colors I used for the owl just amazing????

After heat embossing her I used a little bit of water on a paint brush dipped into assorted colors of Mica Powders from Lindy's Stamp Gang. I love how vibrant and shimmery each color is!! I got a lot of depth in the eyes by waiting for the image to dry while working on the other 7 images and then going back and adding a little extra color.

The bats are black glitter bats from The Paper Studio and I used Christmas Red Stickles to put eyes on them.

Card 2


Card 3


Thanks so much for stopping by to check out my cards! I have a lot more posts to do and I'm working on getting my list scratched off, so be sure to come back soon and see some more projects!
NEXT UP you'll see 15 more Halloween cards that I did! I'm going to try to put 2 cards per post, so be sure to always click the link that says Clickety, Clackety, Click Here to Read More! :)
Keep on Craftin'
~Melisa Marie
No comments:
Post a Comment
Hi! feel free to leave me a comment, I am always interested in what my readers think about my crafty creations! I reserve the right to delete any comment that is offensive or vulgar, and I will definitely delete ANY post that is SPAM. This does not mean I will delete your comment just because you say you do not like my work, but please just keep all language clean and help keep my blog clean and free of spam!
If you leave a comment, *PLEASE* click on "Subscribe by e-mail" so that follow up comments may be sent to you, because I *ALWAYS* reply to comments! Thanks!